|
Monitor W Series Parts Replacement & Rebuilding Tips, by Don Mathews, October-1990
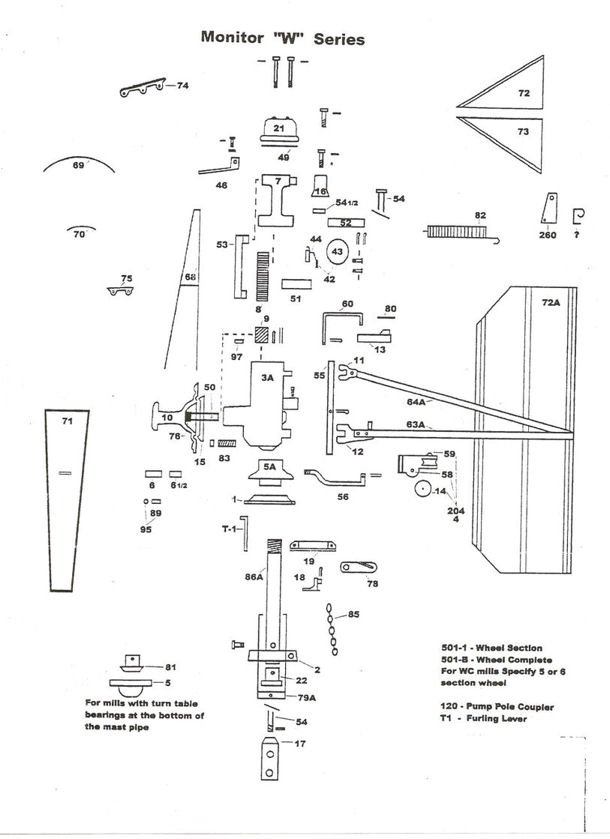
The simple design of W Series Monitor mills makes replacement of most parts an obvious procedure.
Secure a parts list & diagram, like that offered by Windmill-Parts.Com above, and follow my step by step tips. Simply
reverse the noted removal procedure for reinstallation.
1. To Replace #8 Crank Gear and/or #53 Pitman, #51 Shaft;
a) Drive #52 pin out, remove screws from oil ring assembly. Remove
#7 guide from #53 pitman
after unscrewing bolts from #16 rod eye
and letting #54 piston drop down.
Remove #46 oil trough.
b) Remove pipe plug from front of case. Loosen shaft set screw at
rear of case and drive #51
shaft out far enough to clear gear.
Push it all the way out if #51 shaft is to be replaced.
c) When replacing only #53 a different hole in the gear may be used.
This will not change the stroke length but will
transfer gear wear
to a new group of teeth.
d) Pitman goes on flat face of gear.
e) Shaft must be flush with flat face of gear.
f) Clean oil holes in #7 guide.
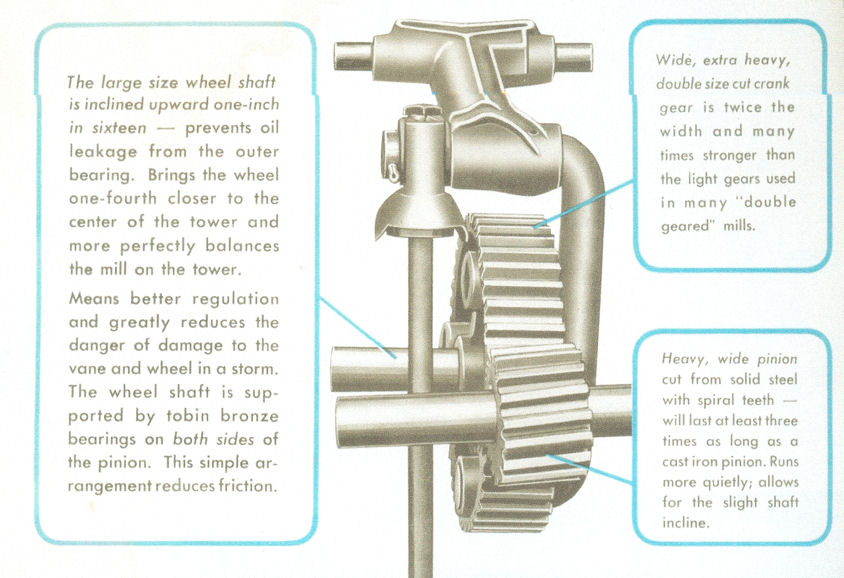
2. To Replace # 6 / 6 1/2 Shaft Bushings and/or #9 Pinion, #10 Hub w/ Shaft;
a) Unbolt #68 wheel spokes and remove from #10 hub.
b) Complete steps 1a & 1b as noted above.
c) Pull cotter pin from behind #9 pinion noting position
of thrust washers.
d) Pull hub w/shaft through pinion. Pinion is slip fit on
shaft with special
Woodruff key. It may require some
jarring. Bushings
at front and rear of shaft are now
exposed. Replace
#97 key if worn. Be sure to clean oil
passage under front
bushing.

3. To Replace Brake Assembly;
a) Pull cotter pin from rear of #56 brake rod and slide it
off its rails. When installed rod end should be flush
with face of square nut or further depending on desired
braking pressure.

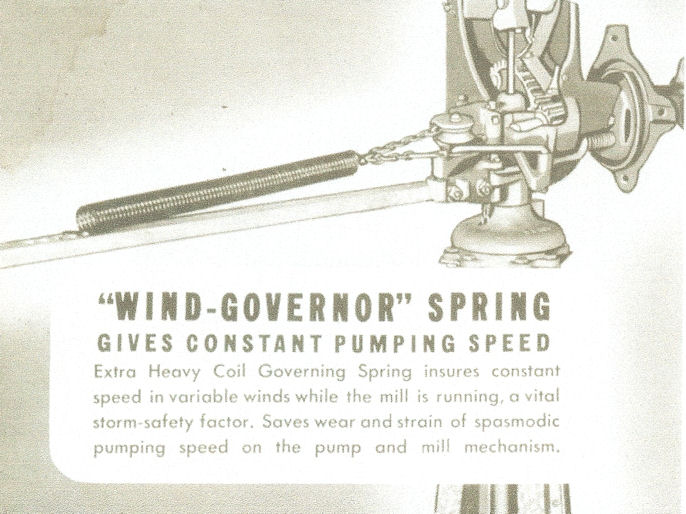
4. To Replace #85 Chain Assembly;
a) Unhook #82 spring from vane stem noting spring hole
location on stem.
b) Remove chain from #80 upper chain end.
c) Remove #78 chain end from #18 swivel.
d) Remove #78 from chain and pull chain up and out
through sheaves.
e) To replace feed a flexible wire through sheaves hooking
chain and pulling back through sheaves. Use 7th link
from upper end of chain as #82 spring mounting
location.
Windmill-Parts.coms has new #82 Springs as low as $22 which is 50% off other Monitor Dealer
list pricing.
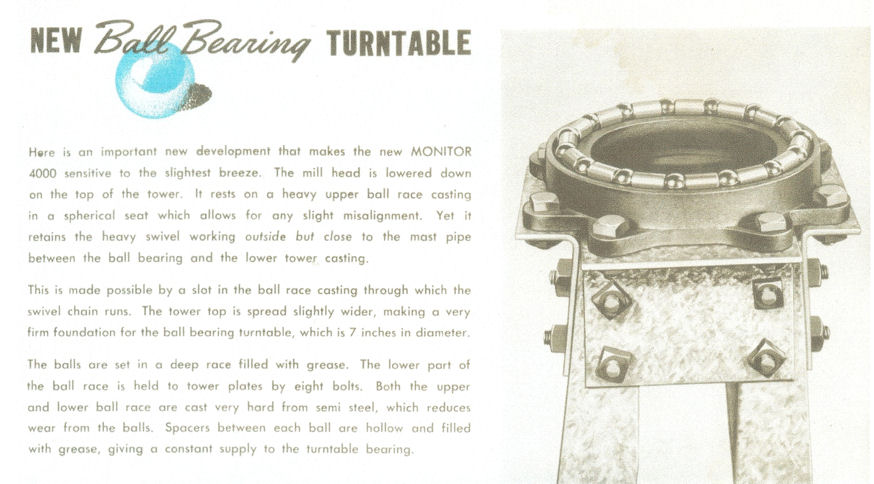
5. To Replace Turntable Balls;
a) Remove bolt from #22 lower rod guide and drop guide
from pipe.
b) Raise head and #5A race casting high enough to
replace balls. It is not recommended to use the old style
spacers instead increasing the number of balls. This
provides a more even distribution of weight, reducing
wear.
c) Pack new balls with marine grade axle grease.
d) When letting #5A & head back down be sure that notch
on bottom of case engages correct #5A boss for proper
chain travel. Lower sheave must be above chain
opening in #5A.
e) After replacing #22 guide in pipe adjust #2A tower
casting to 1/16" above flange on guide. Grease area.
Windmill-Parts.com sells replacement race full ball sets starting at $10 representing
savings of
more than 50% OFF published Dealer List pricing.
f) For early mills with turntable
cup at bottom of mast,
procedure is conceptually
the same. See Assembly
Guide PDF download
above for details.
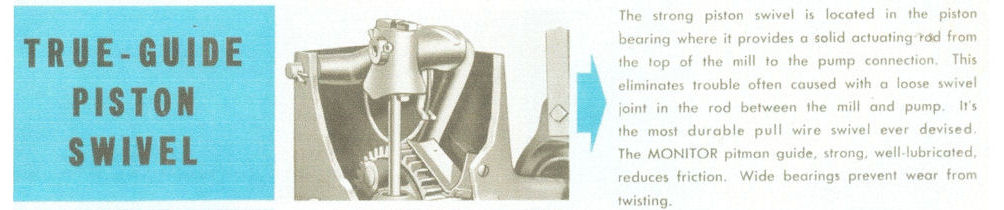
6. To Replace #54 Piston Rod;
a) Remove #17 casting and locknut from rod. Take #21
cover off and unbolt #54 1/2 plate fron #16 swivel eye.
b) Remove #16 eye from #7 guide and pull rod up and out
of case.
c) Grease head of rod before bolting plate to eye.
d) Be sure lock washer is used on head of each bolt.
7. To Replace Swivel Assembly #18, 19A & #79 Bail;
a) Remove pull wire from #79 bail.
b) Loosen both nuts on #19A outer swivel. Disassemble
and remove bail.
c) Pull cotter pin and remove #78 chain end to replace #18
inner swivel.
d) Grease area.
Annual Maintenance
1. Change your oil refilling only to the level of the oil fill
hole on the rear of the case. A WB uses 1.5 quarts
and a
WC uses 2 quarts.
Use only special Windmill Oil as sold
by Windmill-Parts.com for $4.49 per qt.
2. Lubricate all hinges, pins, latches, sheaves and chain with
a light weight oil that will maintain its viscosity in cold
weather.
3. Grease mast pipe and turntable balls with marine grade
axle grease.
4. Check all wheel & tower bolts for loosening.
5. Inspect all moving parts for excessive wear.
Trouble Shooting Guide
1. Mill does not go out of wind when pull wire is released;
a) Check #82 spring to make sure it has not broken,
become disconnected or lost its tension.
b) Check all joints for binding, lubricating if neccassary.
c) Increase #82 spring tension by extending the spring
to the next hole in the vane stem.
2. Mill does not go into the wind when furl lever is pulled
down;
a) Check pull wire to insure it has not stretched or
broken.
b) Make sure pull-in lever has not moved upward on
tower leg.
c) Verify chain, swivel or bail are not broken or damaged.
3. Wheel turns when mill is out of the wind;
a) Brake casting may be worn or broken.
b) Wheel hub brake surface may be worn or grooved.
c) Brake rod may be loose or broken. May need tension
adjusting.
d) Check brake & hub surfaces for oil or grease.
4. Oil leakage at front of shaft snoot;
a) Oil level is too high. See maintenace item above.
b) Oil return passage under front shaft bushing is clogged.
c) Front bushing may be excessively worn.
d) #76 oil collar may be excessively worn.
As with the other commercial aspects of our business we offer replacement parts for
your WB or WC mill at substantial savings versus our competitors. Our hot dipped galvanize replacement wheels for your WB
are only $375 + shipping and wheels for your WC are only $425 + shipping. You can expect similar savings on other items as
well.
|